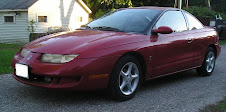
Almost 3 months since my last post. I'd like to say it's because I have been commuting gas- and problem-free for all this time. Alas, no. After commuting for a week or two I decided to fix the vibration in the drive train. So began a series of setbacks and missteps. Then winter set in.
Here's the sad picture of my engine compartment with everything taken out.
With the motor and transmission separated I measured the runout of the flywheel with a gauge indicator. Less than .003" range on both the axial and radial directions. I think most of that runout was just because of the rough surfaces, too. So the flywheel was installed true. The only other explanation would be that pressing the starter ring off the flywheel caused it to go out of balance. So I took it and a new clutch and pressure plate to an automotive machine shop to have them balanced. Here are a couple of pictures of some of the holes they put in the flywheel to bring it into balance. The large hole in the first picture (at about 7:00) existed prior.
With the newly planed (notice the shiny front surface!) and balanced flywheel reinstalled on the motor shaft, the dial indicator showed less than .001" runout.
It's now been over a month since I took the car off the road. It took another 2 weeks to get the car back together and on the road again. The good news is the vibration in the drivetrain is much better. There are still a few speeds where the car gets loud, but I think those are related to the fact that I eliminated the rubber mounts and not from imbalance issues. The bad news is that after a few shifts the clutch stopped working.
The automotive machine shop had wanted to make sure the taperlock hub was balanced as well, so I took the extra effort to get it off. It was stuck on the motor shaft pretty good, not the least because of some rust on the inner hub surface. So when I reinstalled it after the flywheel balancing I put a small amount of anti-seize on the motor shaft. My initial thought about the clutch problem was that perhaps the lubricant had allowed the taperlock hub to be pushed toward the motor by the force of the clutch. So, out everything came again.
Well, the hub had not moved. However, it looked like the new pressure plate was taller than the old one by about .12" so I shifted the hub out a bit, thinking that maybe I was at the end of the throw for the clutch. Put everything back together again. Same result. Clutch works for a few times then nothing. So, maybe the clutch is failing. Before investing in a new clutch, a friend suggested bleeding the clutch hydraulics - maybe some air got in one of the lines while the slave cylinder was hanging free (I had it tied up near the fuse box to keep it out of the way while removing the motor-transmission). Took the cap off the clutch cylinder and pumped the clutch pedal 10 times. Miraculously, the clutch started working again. Sigh.
By now winter had set in, and this year's winter is the real deal. Lots of snow and lots of cold. So even though my drivetrain problems seem to be solved, the cold is really taking a bite out of my batteries. I am not able to get more than 120 amps out of them before the voltage sags below the cutoff for my DMOC controller.
Next entry: battery warmers....
Sunday, January 23, 2011
Monday, November 8, 2010
Back on the EV road
Haven't had an entry in a while. When last we spoke I was dead in the water because of a broken shifter bushing. Here's what it looked like when I removed the center console (bits of black plastic under the shifter is what remained of the bushing - the brown ring at the end of the cable coming from the right side of the picture is where it should have been).
I found a replacement bushing on eBay for $17. It took a few days to arrive, but all of 45 seconds to install. Here's a picture of the bushing snapped into the cable-end ring.
Here is the cable end with bushing snapped on to the bracket connected to the shifter.
And the view from the other side.
Since replacing the bushing, I've put about 400 miles on the car commuting to and from work. The shifter feels great. However, I am still concerned about the vibration coming from the drivetrain, so I am now in the process of taking everything out of the engine compartment so I can get the motor-transmission assembly out for diagnosis. More on that later.
I found a replacement bushing on eBay for $17. It took a few days to arrive, but all of 45 seconds to install. Here's a picture of the bushing snapped into the cable-end ring.
Here is the cable end with bushing snapped on to the bracket connected to the shifter.
And the view from the other side.
Since replacing the bushing, I've put about 400 miles on the car commuting to and from work. The shifter feels great. However, I am still concerned about the vibration coming from the drivetrain, so I am now in the process of taking everything out of the engine compartment so I can get the motor-transmission assembly out for diagnosis. More on that later.
Friday, October 15, 2010
The excitement after the lull after the excitement
Well, after I said that the tread on the tires wasn't too bad Murphy started making himself known. Two of the tires started leaking: one because the rim is so corroded, and one through the valve stem. So I enlisted the help of Tire Rack and in 2 days 4 new wheels showed up at my doorstep, freshly mounted and balanced and ready to go on the car.
Getting insurance was actually more difficult than I expected. My current insurance agent (AAA through Commerce Insurance) refused to cover it because the conversion was not done by a professional. I called a few other agencies that other converters have had success with (Progressive, Farmer's, MetLife) to no avail. Finally, I asked the advice of an acquaintance a few towns from me who is driving a conversion, and he gave me the name of his insurer (Liberty Mutual). They had no qualms about insuring my conversion, so I switched all my auto insurance business to them. Not only that, I'm now paying 20% less even after adding this car to my policy!
Once the insurance was squared away, getting plates was a no-brainer. The insurance agent filled out an RMV1 form for me, specifying that it now has an electric powertrain. I took that and the Title with the purchase info on the back (from 2009!) and took it to the Registry. They didn't look at it twice. Took all of 30 seconds to get my plates (most of that time was filling out the check!) and I was on my way.
Of course, once I went to get it inspected I realized that I should have asked a few more questions because the computer still thought the car was gas powered. Oddly enough, the technician could change it right there on his computer. Who knew?
The inspection experience was interesting. I went to the gas station where we've gotten all of our cars inspected for 10+ years (thinking it might help to have some experience with the guy), and I explained to him that it is now totally electric and that although it is a manual transmission he could treat it as if it were automatic. That was surprisingly hard for him to understand. He kept trying to feather the clutch to get the car started! But he eventually got it into the inspection bay and punched in the license plate number into his computer. That's when we realized the Registry had not done their job right when the registration was entered. But once he made the change on the computer the safety part of the inspection went easily enough, and the sticker went on the window in no time. Of course, by then all of the mechanics were gathered around the car asking questions so I popped the hood and showed them the engine compartment. I couldn't really tell if they were impressed with my handiwork or just thought I was crazy. When I pulled out of the station they were all standing at the inspection bay door watching - wondering if it would actually be able to avoid getting hit? - and I waved out the window as I left. See you next year!! (but not before..... heh, heh)
So here I am at home sucking juice out of the wall.
And at work.
Things were going so well! Then Murphy again knocked at my door. I was tooling around town with a friend (he's helping me work out a way to interface the dashboard tachometer with the DMOC motor controller) the evening after my second commute to work (yes!) when the shifter went slack (no!). Fortunately, it was still in gear but the shifter lost all contact with the transmission. So I pulled over to the side of the road and quickly determined that the connection between the shifter and the shifter cables were gone. So I limped home (boy, acceleration is poor when you start out in 3rd gear!) and took the center console apart. The bushing that held the main shifter cable to the shifter rod was in pieces and scattered about. Well, at least it wasn't something that I had done wrong during the conversion - I never touched the stupid thing!
Of course the dealer sells the bushing only with the entire cable ($216!), but thank goodness for eBay. Apparently these bushing fail all the time and there are people who sell machined parts (<$20) to replace the poorly-designed originals. The only downside is that they have to ship it to me, so I'm spewing fumes to get to work again. But hopefully not for long.
Getting insurance was actually more difficult than I expected. My current insurance agent (AAA through Commerce Insurance) refused to cover it because the conversion was not done by a professional. I called a few other agencies that other converters have had success with (Progressive, Farmer's, MetLife) to no avail. Finally, I asked the advice of an acquaintance a few towns from me who is driving a conversion, and he gave me the name of his insurer (Liberty Mutual). They had no qualms about insuring my conversion, so I switched all my auto insurance business to them. Not only that, I'm now paying 20% less even after adding this car to my policy!
Once the insurance was squared away, getting plates was a no-brainer. The insurance agent filled out an RMV1 form for me, specifying that it now has an electric powertrain. I took that and the Title with the purchase info on the back (from 2009!) and took it to the Registry. They didn't look at it twice. Took all of 30 seconds to get my plates (most of that time was filling out the check!) and I was on my way.
Of course, once I went to get it inspected I realized that I should have asked a few more questions because the computer still thought the car was gas powered. Oddly enough, the technician could change it right there on his computer. Who knew?
The inspection experience was interesting. I went to the gas station where we've gotten all of our cars inspected for 10+ years (thinking it might help to have some experience with the guy), and I explained to him that it is now totally electric and that although it is a manual transmission he could treat it as if it were automatic. That was surprisingly hard for him to understand. He kept trying to feather the clutch to get the car started! But he eventually got it into the inspection bay and punched in the license plate number into his computer. That's when we realized the Registry had not done their job right when the registration was entered. But once he made the change on the computer the safety part of the inspection went easily enough, and the sticker went on the window in no time. Of course, by then all of the mechanics were gathered around the car asking questions so I popped the hood and showed them the engine compartment. I couldn't really tell if they were impressed with my handiwork or just thought I was crazy. When I pulled out of the station they were all standing at the inspection bay door watching - wondering if it would actually be able to avoid getting hit? - and I waved out the window as I left. See you next year!! (but not before..... heh, heh)
So here I am at home sucking juice out of the wall.
And at work.
Things were going so well! Then Murphy again knocked at my door. I was tooling around town with a friend (he's helping me work out a way to interface the dashboard tachometer with the DMOC motor controller) the evening after my second commute to work (yes!) when the shifter went slack (no!). Fortunately, it was still in gear but the shifter lost all contact with the transmission. So I pulled over to the side of the road and quickly determined that the connection between the shifter and the shifter cables were gone. So I limped home (boy, acceleration is poor when you start out in 3rd gear!) and took the center console apart. The bushing that held the main shifter cable to the shifter rod was in pieces and scattered about. Well, at least it wasn't something that I had done wrong during the conversion - I never touched the stupid thing!
Of course the dealer sells the bushing only with the entire cable ($216!), but thank goodness for eBay. Apparently these bushing fail all the time and there are people who sell machined parts (<$20) to replace the poorly-designed originals. The only downside is that they have to ship it to me, so I'm spewing fumes to get to work again. But hopefully not for long.
Friday, October 1, 2010
The lull after the excitement
After those heady days leading up to the Coupe de Volt's maiden voyage, the last few weeks have been a bit of a letdown. But I trudge forward and am getting things done. Progress has been made on a number of fronts:
Fixing stuff that's broken: the burnt out headlight and fog light were easy enough to replace, but the backup lights took a little more effort. I quickly determined that the bulbs were fine and that the problem was in the "back-up light switch" on the transmission. Fortunately, it was very easy to replace ($15 at Autozone) so I now have working backup lights. I think the car will pass the safety inspection now (tires are loud but the tread is good so I think they'll be ok, and the alignment isn't that bad).
Battery monitoring: I had previously run 3 wires from the batteries in the front of the car to the rear of the car for the PakTrakr, so the next step is to splice in to those wires to make the connections to the batteries and the PakTrakr remote module. Each remote monitors six batteries, so I needed 3 remotes to monitor my bank of 13. The instructions for connecting the batteries to the remotes were straightforward, but it was a little confusing at first as to how to connect the 3 remotes together and to the display. After a bit of trial and error I finally got it right. The correct wiring scheme goes like this:
Wire #1 from each remote (to be connected to the negative terminal of the lowest potential battery in the series for that remote) has an in-line fuse soldered to the lug. So because "Battery #1 is in the front of the car I had to splice that lug/fuse into the wire that I had previously run through the car. That was really the only tricky part to connecting the PakTrakr wires to the batteries.
Slight modification to the battery box vent: I placed the vent hole in the back of the battery box as high as I could without cutting into the steel frame, but the hole was actually below the top of the batteries! So I constructed an air dam to draw air from the top of the box. The air dam consists of a few layers of plywood which are glued together then screwed to the wood. Here are a couple pictures:
Fixing stuff that's broken: the burnt out headlight and fog light were easy enough to replace, but the backup lights took a little more effort. I quickly determined that the bulbs were fine and that the problem was in the "back-up light switch" on the transmission. Fortunately, it was very easy to replace ($15 at Autozone) so I now have working backup lights. I think the car will pass the safety inspection now (tires are loud but the tread is good so I think they'll be ok, and the alignment isn't that bad).
Battery monitoring: I had previously run 3 wires from the batteries in the front of the car to the rear of the car for the PakTrakr, so the next step is to splice in to those wires to make the connections to the batteries and the PakTrakr remote module. Each remote monitors six batteries, so I needed 3 remotes to monitor my bank of 13. The instructions for connecting the batteries to the remotes were straightforward, but it was a little confusing at first as to how to connect the 3 remotes together and to the display. After a bit of trial and error I finally got it right. The correct wiring scheme goes like this:
Wire #1 from each remote (to be connected to the negative terminal of the lowest potential battery in the series for that remote) has an in-line fuse soldered to the lug. So because "Battery #1 is in the front of the car I had to splice that lug/fuse into the wire that I had previously run through the car. That was really the only tricky part to connecting the PakTrakr wires to the batteries.
Slight modification to the battery box vent: I placed the vent hole in the back of the battery box as high as I could without cutting into the steel frame, but the hole was actually below the top of the batteries! So I constructed an air dam to draw air from the top of the box. The air dam consists of a few layers of plywood which are glued together then screwed to the wood. Here are a couple pictures:
Friday, September 10, 2010
On the road!!!
I had finished the dash gauges and the battery connections on Tuesday, and considered if I should try to run the car or not. I was a little squeamish about doing the "smoke test" and wondered whether I should push the car outside the garage so it wouldn't take the garage with it when it caught on fire. But the garage owner convinced me to do it, sooooo....
Later that night I do more reading. There are a number of variables and parameters that could cause the motor to cut out, related to torque limits, current limits, what have you. I figure I'd better connect the laptop again and see what the DMOC is saying. The next day I'm anxious all day. It's almost as bad as when my wife was expecting - the anticipation is killing me! As soon as I can, I get over to the car again.
Maiden voyage complete!
So, my take from the experience.
I'm off for a week now, taking my daughter to her first year of college (in IL), so nothing's going to be done for a while. Next steps: fix the broken things, install the Pak-Trakr (battery monitoring), finish the dash switches (that control the cabin heater and DMOC regen settings), install the battery box lids, and get the car registered!
I'm excited and motivated again!
- Connect the accessory battery. No smoke. No blown fuses.
- Connect the Anderson connector to put the traction battery voltage to the DMOC. No smoke or sparks.
- Turn the key to the "on" position. The usual warning lights come on then go off except for "service engine soon" (yep, better check that!) and "low fuel" (no gas here!). The vacuum pump runs for about 8 seconds, then shuts off. Other than that, nothing.
- Put it in neutral. Press on the accelerator. Nothing. No spinning sound. Bummer.
- Hook up the laptop to the DMOC. Read the ccShell instructions. 1st thing it says to do is load the .ccs file that came with the DMOC. Oops. I forgot to bring the file! Go home with my tail between my legs.
- Connect the laptop to the DMOC.
- Turn the key on.
- Check the "Drive Enable" configuration. Yep, it's looking for the signal.
- Disable the signal, save the parameters. I hear a nice ka-chunk as the contactor closes. Yes!
- Disconnect the laptop, close the hood, get in the car.
- Put it in neutral. Press on the accelerator. I hear spinning!
- Put it in reverse. Back out of the garage. I'm moving!
- Put it in forward to drive out toward the road. Nothing. I feel a little rocking motion, then the motor kicks out. Reverse, 1st gear, 2nd gear, doesn't matter.
- Put it back in neutral. Motor spins. Hmm. Transmission problem?
- It's late and I have to go. So I get some help and push it back in the garage. That's a bummer.
Later that night I do more reading. There are a number of variables and parameters that could cause the motor to cut out, related to torque limits, current limits, what have you. I figure I'd better connect the laptop again and see what the DMOC is saying. The next day I'm anxious all day. It's almost as bad as when my wife was expecting - the anticipation is killing me! As soon as I can, I get over to the car again.
- Connect the laptop to the DMOC. This time I use a longer serial cable so I can run it out of the hood and through the open passenger window so I can keep communicating with the DMOC.
- Turn the key on.
- ccShell says the last error was #16, PS_FLT_CHARGER_ERROR. Apparently it's an error related to inadequate grounding or shielding. Hmm. It also says that in subsequent revisions of the software this error has been deleted, and can be ignored by setting a variable.
- I set the variable to ignore the error.
- I get in the car, put it in reverse. Back it out of the garage. So far so good.
- I put it in 1st gear. Forward motion!
- I drive out toward the road. I slap on plates from my other car.
- I drive to a friend's house. We chat. I show him the car. I drive home. I turn the regen on, then off, then on, noticing how it changes the driveability. I like it when the ammeter shows negative amps. Recovering energy - cool! All in all a 4 mile trip, speeds from 30-45 mph. Very satisfying.
Maiden voyage complete!
So, my take from the experience.
- The EV grin is real. And very satisfying.
- Pick-up was not great. I was able to get up to speed, but it took longer than I liked. On the other hand, I noticed that I was never pulling more than 150 amps. The paperwork says that the max current is just under 300 amps, so maybe it comes tuned down at first and the pick-up can be improved?
- The car needs some (non-EV) work. Back-up lights don't work, one of the headlights and fog lights are out, the tires are LOUD, it needs a front-end alignment, and there is some noise/vibration from the drive train (transmission?).
I'm off for a week now, taking my daughter to her first year of college (in IL), so nothing's going to be done for a while. Next steps: fix the broken things, install the Pak-Trakr (battery monitoring), finish the dash switches (that control the cabin heater and DMOC regen settings), install the battery box lids, and get the car registered!
I'm excited and motivated again!
Catching up - battery connections and dash gauges
I've been neglecting the blog lately (again), but have made progress. And last night, yes, the car went on the road for the first time! Very exciting. Still much to do before it'll pass inspection, though. More on that later.
Battery connections:
In order to make up the battery cables, I "splurged" and bought an el-cheapo hydraulic crimper from Harbor Freight and went to town. Following the instructions from the ElectroAutomotive kit, I cut back the insulation on the cable, filled the lug with Noalox, inserted the wire, crimped it, slipped a piece of heat shrink tubing over it, heated it up to shrink it down, and voila. A completed connection. Repeat 137 times. Or so it seemed.
Here are a couple of views with the batteries connected. The big piece of pink plastic tubing seen in two of the views is 1" heat shrink covering the fusible link for electrical isolation. The same pink heat shrink is covering the main tie-down for the lower box - during installation that steel tubing has to come very close to terminals!
Next I made the connections to the main shunt and the motor controller.
Dash gauges:
For the 3 gauges supplied with the kit (traction pack current and voltage, accessory battery voltage) I bought a generic 3-gauge pod that mounts on top of the dashboard. Nothing spectacular here. I ran the wires up from under the dash and through a couple of small holes drilled in the top of the dash. For mounting the pod I cut out a small piece of aluminum (.1" thick), drilled and tapped holes to match the mounting holes on the pod, and sandwiched the dash skin between the aluminum and pod. Very solid. Here are a couple views of the installation. Sorry for the dirty windows.
Battery connections:
In order to make up the battery cables, I "splurged" and bought an el-cheapo hydraulic crimper from Harbor Freight and went to town. Following the instructions from the ElectroAutomotive kit, I cut back the insulation on the cable, filled the lug with Noalox, inserted the wire, crimped it, slipped a piece of heat shrink tubing over it, heated it up to shrink it down, and voila. A completed connection. Repeat 137 times. Or so it seemed.
Here are a couple of views with the batteries connected. The big piece of pink plastic tubing seen in two of the views is 1" heat shrink covering the fusible link for electrical isolation. The same pink heat shrink is covering the main tie-down for the lower box - during installation that steel tubing has to come very close to terminals!
Next I made the connections to the main shunt and the motor controller.
Dash gauges:
For the 3 gauges supplied with the kit (traction pack current and voltage, accessory battery voltage) I bought a generic 3-gauge pod that mounts on top of the dashboard. Nothing spectacular here. I ran the wires up from under the dash and through a couple of small holes drilled in the top of the dash. For mounting the pod I cut out a small piece of aluminum (.1" thick), drilled and tapped holes to match the mounting holes on the pod, and sandwiched the dash skin between the aluminum and pod. Very solid. Here are a couple views of the installation. Sorry for the dirty windows.
Monday, August 30, 2010
Completing the main battery box
The batteries have been loaded into the main battery box. Here's how it went.
I previously showed connecting the exhaust vent and fan to the rear of the box and to the back of the trunk. On the front side of the box I had previously made a cutout for the battery cables to run through. Using a hodge-podge of electrical and plumbing fixtures and adapters, I cobbled together something which connects the conduit which I had previously installed in the hump and the front of the battery box. Here's a picture of the hodge-podge in place.
Next I caulked around the edges of the wood pieces inside the box. I will probably regret this later when I decide to rebuild the box, but I used silicone caulking (white, no less). Hopefully it won't be too ugly to remove. Once that was cured I started loading batteries, starting with the batteries in the rearmost positions. It was a pretty awkward situation, and since the batteries weigh 87 lbs each I could not lift them into the back box. I considered some elaborate hoist that could levitate the batteries into position, but then snapped out of it and placed a piece of plywood to act as a ramp from the forward lip to the rear of the box. Worked like a dream.
I had previously designed battery tie-downs to keep them from jumping and sliding around while I'm driving, but I also want to constrain them from the bottom as well. I bought some rectangular HDPE extrusions (3/8" x 1") to use as guides - I figured I'd screw them in to the bottom wood to give myself a positive stop when positioning the batteries. Here's a view of the guide at the back of the box.
Here's a view of the "side guide" for the back of the box. I hung this one from the side because the gap was too narrow to use the full width on the bottom.
Here's a view of guides that are just wedged in between the batteries. (Not a press fit, just snug)
Here's a view of the front guides in the rear section.
I used the same technique to create guides in the front section as well. Some screwed into the bottom wood before the batteries are installed, others slid into place after the batteries are loaded. In this case, the batteries were designed to be snug against the front wood so no shims were required there.
With all the batteries in place, it looks like this:
Here's a close-up of one of the tie-downs:
So, now that the car is fully loaded I can see how good my calculations were for the strength of the new rear springs. The rear end is about an inch taller than the front. Not too bad. I may have to adjust those at some point - just have to wait and see how it looks from a distance.
Next stop: battery cables.
I previously showed connecting the exhaust vent and fan to the rear of the box and to the back of the trunk. On the front side of the box I had previously made a cutout for the battery cables to run through. Using a hodge-podge of electrical and plumbing fixtures and adapters, I cobbled together something which connects the conduit which I had previously installed in the hump and the front of the battery box. Here's a picture of the hodge-podge in place.
Next I caulked around the edges of the wood pieces inside the box. I will probably regret this later when I decide to rebuild the box, but I used silicone caulking (white, no less). Hopefully it won't be too ugly to remove. Once that was cured I started loading batteries, starting with the batteries in the rearmost positions. It was a pretty awkward situation, and since the batteries weigh 87 lbs each I could not lift them into the back box. I considered some elaborate hoist that could levitate the batteries into position, but then snapped out of it and placed a piece of plywood to act as a ramp from the forward lip to the rear of the box. Worked like a dream.
I had previously designed battery tie-downs to keep them from jumping and sliding around while I'm driving, but I also want to constrain them from the bottom as well. I bought some rectangular HDPE extrusions (3/8" x 1") to use as guides - I figured I'd screw them in to the bottom wood to give myself a positive stop when positioning the batteries. Here's a view of the guide at the back of the box.
Here's a view of the "side guide" for the back of the box. I hung this one from the side because the gap was too narrow to use the full width on the bottom.
Here's a view of guides that are just wedged in between the batteries. (Not a press fit, just snug)
Here's a view of the front guides in the rear section.
I used the same technique to create guides in the front section as well. Some screwed into the bottom wood before the batteries are installed, others slid into place after the batteries are loaded. In this case, the batteries were designed to be snug against the front wood so no shims were required there.
With all the batteries in place, it looks like this:
Here's a close-up of one of the tie-downs:
So, now that the car is fully loaded I can see how good my calculations were for the strength of the new rear springs. The rear end is about an inch taller than the front. Not too bad. I may have to adjust those at some point - just have to wait and see how it looks from a distance.
Next stop: battery cables.
Subscribe to:
Posts (Atom)